
Complete Beginners Guide to Printing Miniatures
Welcome to our Complete Beginners Guide to Printing Miniatures. The popularity of printing miniatures has grown massively over the last 12 to 18 months as the hardware has become more affordable and accessible to the consumer market. Whether you want to print miniatures for your tabletop games or just to paint, there is no better time than now to enter the hobby.
This guide is your first introduction to 3d Printing Tabletop miniatures and while not delving into full detail, it will ensure you are equipped with enough knowledge to be able to select the correct equipment whilst ensuring you are informed of all the important considerations before you press the buy button on your new printer.
The Technology
“3d Printing” covers a wide spectrum of printer technologies and at first it can seem a little daunting when trying to choose the best for printing miniatures. However, for printing miniatures there is now only one recommendation to make.
FDM Printers
Until recent years the go to option was FDM, Fused Deposition Modelling. In FDM printing, a heated nozzle extrudes plastic filament onto a print bed. As the plastic is extruded out of the nozzle the printhead moves across the print bed. After completing a print layer, the printhead then moves up a small amount and repeats this process until a model is fully built.
While FDM can produce acceptable results, it has its limitations. The biggest and most important limitation when printing miniatures is the visible layer lines produced by FDM printers.

Resin Printers
The term “Resin Printer” is broad stroke and captures many technologies such as SLA, DLP and MSLA. All resin printers use a resin material that hardens when exposed to UV light. MSAL resin printers utilise a light source, masked by an LCD screen to project an entire print layer at once. The UV light will strike the liquid resin in the VAT causing it to form a layer of a printed object onto the build plate.
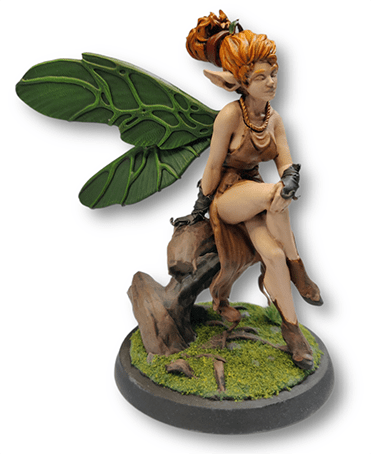
Typical Resin 3d Printers can print at a layer height of 0.05mm which is ideal for achieving consumer quality, highly detailed and smooth tabletop miniatures ready for painting.
Now that we have discussed both technologies the answer is simple, while FDM has a place, for printing miniatures Resin is the way to go.
Before you buy
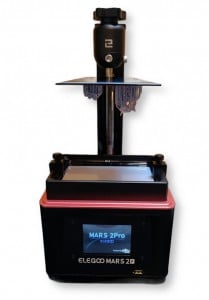
If you have not already settled on which printer to buy, be sure to check out our “Best Printers for Miniatures” article for some of the best buy options currently available to fit all budgets.
Before you commit your hard-earned cash there are some very important considerations to be aware of. As with any new technology uptake there is a learning curve and it is true that with Resin 3d Printing the curve can be a little steep. However, by reading this and our other articles in the beginners guide series we aim to flatten that curve out and set you out on this new adventure eyes wide open.
Health & Safety
The Resin itself is toxic and must be handled safely and correctly to avoid contact with the skin, ingestion and over exposure to the fumes. Therefore, it is very important to have a suitable location in the home for your new printer, well ventilated and away from the reach of children and pets. Beyond safety you should also consider how to dispose of waste materials to protect the environment, this is not stuff you can simply wash down the kitchen sink.
Location & Temperature
Many people find a suitable hobby room or garage location for this very purpose. When choosing the location also consider that temperature plays a part in achieving successful prints. Ideally you want a location where you can be satisfied that the temperature can be maintained at least at 20oC for the duration of a print. Different resins have different temperature recommendations but in general 20oC should be considered the minimum.
Work Flow
This is something that is often overlooked by the beginner. Having just created your first print on your shiny new printer there are some post processing steps required before that new miniature can be put into play in your tabletop game or painted.
As your print sits on the build plate, it is not yet cured and is covered with uncured resin. Therefore, we establish a workflow.
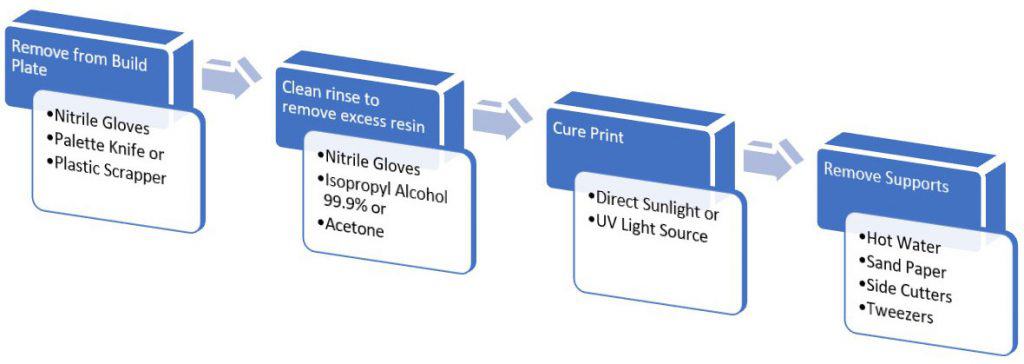
So what else do I need?
From the above graphic you can see that in addition to the printer there are some other items that you need to factor in, typically consumable items. As a bare minimum this is what you will need to get started beyond the printer itself. We will go into this in more detail in a further article but for now this list will give you a basic idea of what you can expect to need.
- Nitrile latex free gloves – you will get an initial 5 Pairs with most printers.
- Few Printers come with Resin so check out our article on “The Best Resin for Miniatures”.
- Palette Knife – better than the Scraper supplied with most Printers.
- Rinsing Solution – IPA 99% or Acetone
- Wash containers – Pickle strainers are ideal.
- Microfibre cleaning clothes
- Household cleaning rolls
Acronyms
Finally, as you begin to explore the content on here and further afield you will see many unfamiliar terms, so as a heads up.
FEP – A transparent film installed attached to the resin tank (VAT). It creates a clean way for the UV light to cure liquid resin during the whole printing process.
VAT – The Resin tank which holds the liquid resin.
BUILD PLATE – The surface onto which your cured print layer will first adhere. After layer one, subsequent layers will be built up. The build plate will be lowered and raised into the VAT curing layer by layer until the model is completed.
LAYER HEIGHT – The layer height for each layer, for miniatures typically 0.05mm decreasing to 0.025mm. The smaller the layer height the greater the detail can be achieved, at the cost of print time as more layers are required.
STL – STL is the industry standard file type for 3D Printing.
SLICER –Software to prepare your model for the printer that provides access to important settings such as the exposure times and lift speeds. Furthermore, the software allows you to position, scale, rotate your model on the build plate as well as adding supports. Free Slicers include Chitubox and Lychee.
LIFT SPEED. The speed at which your build plate will lower and retract while printing.
EXPOSURE TIME – The light on time for each layer.
SUPPORTS – Depending on the STL file you have acquired for printing it is likely that in-order to achieve a full print your model will need supports. Thankfully, there are many sources that provide pre-supported models for printing while you learn the ropes.
Throughout this site we have many articles covering the above topics and more so for now knowing what these terms are will be of a great help.